Homemade Pita Bread Fluffy
Highlighted under: Quick & Easy
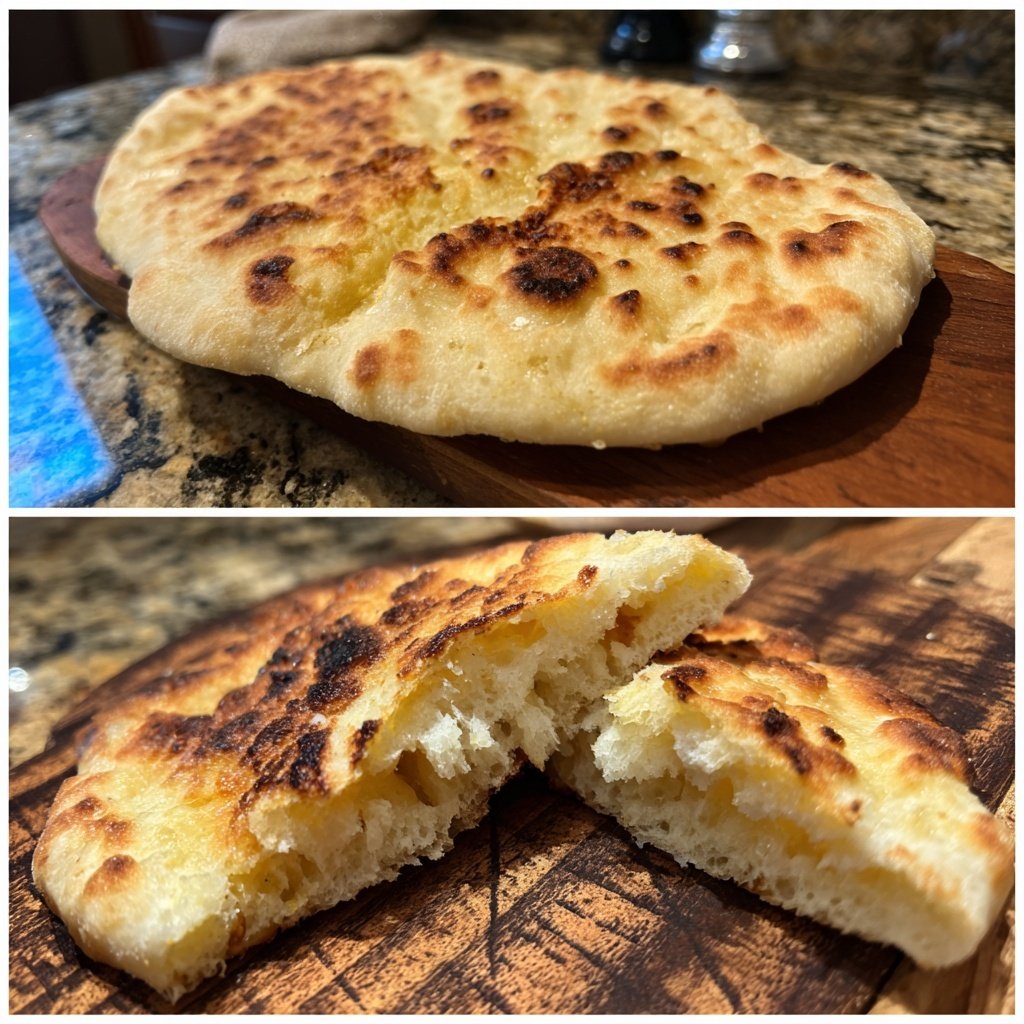
Experience the delight of homemade pita bread that puffs up beautifully, creating the perfect pocket for your favorite fillings.
Making pita bread at home is a rewarding experience. Not only do you get to enjoy fresh, fluffy pitas, but you also get to customize them to your taste. Whether you serve them with dips or fill them with your favorite ingredients, these pitas are sure to impress!

Why You'll Love This Recipe
- Soft and fluffy texture that pairs perfectly with dips and fillings.
- Quick and easy to make with simple ingredients.
- Perfect for family gatherings or casual meals.
The Art of Pita Bread
Pita bread has a rich history, originating from the Mediterranean and Middle Eastern regions. Its unique ability to puff up during cooking creates a pocket, making it perfect for stuffing with delicious fillings. Whether you're looking to create an authentic gyros experience or simply want a side for your favorite dips, mastering homemade pita bread is a rewarding endeavor that will elevate your culinary skills.
Making pita bread at home allows you to control the ingredients and customize flavors to suit your taste. You can experiment with whole wheat flour for a nuttier flavor or add herbs and spices to the dough for an extra kick. The possibilities are endless, and the result is always a delightful, fluffy bread that your family and friends will love.
Tips for Perfect Pita
To achieve that perfect puff, ensure your skillet or griddle is adequately preheated before adding the pitas. A hot surface is essential for creating steam inside the dough, which causes it to puff. Additionally, avoid overcrowding the cooking surface; cook one or two pitas at a time to allow for even cooking and browning.
Another helpful tip is to keep your dough covered while it rises and during cooking to retain moisture. This will help ensure that your pitas remain soft and chewy rather than dry and hard. If you notice any cracks in the dough during shaping, simply gently knead it back together to create a smooth surface before cooking.
Storing and Reheating Pita Bread
Once you've made your homemade pita bread, you may have some leftovers. To store them, let the pitas cool completely, then place them in an airtight container or a resealable plastic bag. They can be stored at room temperature for a couple of days or in the refrigerator for up to a week. For longer storage, consider freezing them. Wrap each pita in plastic wrap and then in aluminum foil before placing them in a freezer bag.
When you're ready to enjoy your pitas again, reheating is simple. For the best results, place them in a preheated oven at 350°F (175°C) for about 5 minutes, or until warm. Alternatively, you can warm them in a skillet over low heat for a minute on each side. This will help restore their soft, fluffy texture, making them just as enjoyable as when they were freshly made.
Ingredients
For the Pita Dough
- 2 cups all-purpose flour
- 1 teaspoon salt
- 1 teaspoon sugar
- 1 packet (2 1/4 teaspoons) active dry yeast
- 3/4 cup warm water
- 1 tablespoon olive oil
Make sure to use warm water to activate the yeast properly!
Instructions
Prepare the Dough
In a bowl, combine the warm water, sugar, and active dry yeast. Let it sit for about 5 minutes until foamy. In a separate bowl, mix the flour and salt. Add the yeast mixture and olive oil to the flour, and knead until a smooth dough forms.
Let the Dough Rise
Cover the dough with a damp cloth and let it rise in a warm place for about 1 hour or until doubled in size.
Shape the Pitas
Once risen, punch down the dough and divide it into 8 equal pieces. Roll each piece into a ball and flatten it into a disc about 1/4 inch thick.
Cook the Pitas
Preheat a skillet or griddle over medium-high heat. Cook each pita for about 2-3 minutes on each side, until they puff up and develop golden brown spots.
Serve and Enjoy
Remove the pitas from the heat and cover them with a towel to keep warm. Serve with your favorite dips or fillings.
Enjoy your homemade pita bread warm for the best experience!
Pro Tips
- For extra flavor, consider adding herbs or spices to the dough.
Serving Suggestions
Homemade pita bread is incredibly versatile and pairs wonderfully with a variety of dishes. Serve them alongside classic dips like hummus, tzatziki, or baba ganoush for a delightful appetizer. You can also use them as a base for sandwich-style meals, filling them with grilled meats, fresh vegetables, and tangy sauces for a satisfying lunch or dinner.
For a fun family meal, set up a pita bar where everyone can customize their own pitas with an assortment of fillings. Include items like falafel, roasted vegetables, or shredded chicken, along with fresh herbs and sauces. This interactive dining experience is sure to please everyone at the table and make mealtime more enjoyable.
Nutritional Benefits
Making pita bread at home allows you to choose healthier ingredients, making it a nutritious option for your meals. By using whole grain flour, you can increase fiber content, which promotes digestive health and keeps you feeling full longer. Additionally, homemade pita bread contains no preservatives or artificial ingredients, providing a cleaner alternative to store-bought options.
Pita bread is also low in fat and can be a great source of carbohydrates, providing energy for your day. When filled with fresh vegetables and lean proteins, it can be part of a balanced diet. Embrace the wholesome goodness of homemade pita bread and feel good about what you’re serving your family.
Questions About Recipes
→ Can I use whole wheat flour instead?
Yes, you can substitute whole wheat flour, but the texture may be denser.
→ How do I store leftover pitas?
Store them in an airtight container at room temperature for up to 2 days.
→ Can I freeze the pitas?
Yes, you can freeze them. Just place parchment paper between each pita and store in a freezer bag.
→ Why are my pitas not puffing up?
Ensure your dough is well-kneaded and the skillet is hot enough before cooking.
Homemade Pita Bread Fluffy
Created by: The Simplecooktips Team
Recipe Type: Quick & Easy
Skill Level: Beginner
Final Quantity: 8 pitas
What You'll Need
For the Pita Dough
- 2 cups all-purpose flour
- 1 teaspoon salt
- 1 teaspoon sugar
- 1 packet (2 1/4 teaspoons) active dry yeast
- 3/4 cup warm water
- 1 tablespoon olive oil
How-To Steps
In a bowl, combine the warm water, sugar, and active dry yeast. Let it sit for about 5 minutes until foamy. In a separate bowl, mix the flour and salt. Add the yeast mixture and olive oil to the flour, and knead until a smooth dough forms.
Cover the dough with a damp cloth and let it rise in a warm place for about 1 hour or until doubled in size.
Once risen, punch down the dough and divide it into 8 equal pieces. Roll each piece into a ball and flatten it into a disc about 1/4 inch thick.
Preheat a skillet or griddle over medium-high heat. Cook each pita for about 2-3 minutes on each side, until they puff up and develop golden brown spots.
Remove the pitas from the heat and cover them with a towel to keep warm. Serve with your favorite dips or fillings.
Extra Tips
- For extra flavor, consider adding herbs or spices to the dough.
Nutritional Breakdown (Per Serving)
- Calories: 150 kcal
- Total Fat: 3g
- Saturated Fat: 0g
- Cholesterol: 0mg
- Sodium: 250mg
- Total Carbohydrates: 28g
- Dietary Fiber: 1g
- Sugars: 0g
- Protein: 4g